Installing Board and Batten Siding Over Stucco
Installing board and batten siding over stucco offers a fantastic way to refresh your home’s exterior, adding both curb appeal and protection. This process, while potentially challenging, is achievable with careful planning and execution. We’ll guide you through each step, from prepping the stucco surface to nailing down the final trim, ensuring a professional-looking result that will last. This guide covers surface preparation, framing, siding installation, and finishing touches, addressing common challenges along the way. Get ready to transform your home’s exterior!
This project involves several key stages. First, you’ll need to thoroughly prepare the stucco surface, addressing any cracks or moisture issues. Next, you’ll install furring strips to create a level base for your siding. Then comes the actual installation of the board and batten, paying close attention to cutting, fitting, and fastening. Finally, you’ll seal, caulk, and finish the siding with paint or stain, completing the transformation.
Surface Preparation
Source: b-cdn.net
Getting your stucco ready for board and batten is crucial for a long-lasting, beautiful finish. A well-prepared surface ensures the siding adheres properly and prevents future problems like cracking or peeling. This involves several key steps, from cleaning and repairing to priming the surface.
Cleaning the Stucco
Thoroughly cleaning the stucco removes dirt, loose paint, mildew, and other debris that could interfere with adhesion. Use a pressure washer set to a low pressure to avoid damaging the stucco. For stubborn stains, a solution of trisodium phosphate (TSP) and water can be effective, but always follow the manufacturer’s instructions and wear appropriate safety gear. After washing, allow the stucco to dry completely before moving on to the next step. This drying time will vary depending on weather conditions but could take several hours or even a full day.
Repairing Cracks and Imperfections
Stucco often develops cracks over time. These need to be repaired before installing board and batten. Small cracks can be filled with a high-quality acrylic caulk. Larger cracks may require patching with a stucco patching compound. Apply the patching compound according to the manufacturer’s instructions, ensuring it’s smooth and level with the surrounding stucco. Allow ample time for the patching compound to cure completely before priming.
Moisture Testing
Before applying any primer, it’s vital to test the stucco for moisture. High moisture levels can lead to mold growth and siding failure. Use a moisture meter to check different areas of the stucco. If moisture levels are high, you’ll need to address the source of the moisture problem before proceeding. This might involve fixing leaks, improving drainage, or using a dehumidifier. Only when the moisture levels are within acceptable ranges should you continue with the priming process.
Priming the Stucco
Priming provides a uniform surface for the board and batten to adhere to and helps prevent moisture absorption. Choose a primer specifically designed for stucco and exterior use. Apply the primer evenly using a roller or brush, following the manufacturer’s instructions regarding drying time between coats. Two coats are generally recommended for optimal coverage and adhesion.
| Primer Type | Description | Advantages | Disadvantages |
|---|---|---|---|
| Acrylic Primer | A water-based primer that offers good adhesion and flexibility. | Easy cleanup, low odor, breathable, good for most stucco types. | May require multiple coats for complete coverage, less durable than oil-based primers in extreme weather. |
| Oil-Based Primer | Solvent-based primer is known for its superior durability and blocking properties. | Excellent adhesion, durable, seals porous surfaces effectively. | Strong odor, longer drying time, requires mineral spirits for cleanup, may not be suitable for all stucco types. |
| Alkyd Primer | A blend of oil and water-based properties, offering a balance of durability and ease of use. | Good adhesion, relatively fast drying time, and less odor than oil-based primers. | May still have some odor, and requires proper ventilation during application. |
| Stain-Blocking Primer | Specifically formulated to prevent bleed-through from stains or mildew. | Prevents stain bleed-through, and provides a uniform base coat. | May require additional coats, and can be more expensive than standard primers. |
Framing and Sheathing
Source: amazonaws.com
Getting your framing and sheathing right is crucial for a smooth, long-lasting board and batten installation. This step ensures a level surface for your siding and provides a solid base to attach it to. We’ll cover the materials, methods, and best practices for this important phase.
Installing furring strips over your stucco creates the necessary space for proper ventilation and provides a flat surface for the sheathing and siding. This prevents the siding from conforming to any irregularities in the stucco and avoids potential issues like cracking or warping. The type of furring strip you choose will depend on your budget and the specific conditions of your project.
Furring Strip Installation
Furring strips are typically made of wood (like pressure-treated lumber or cedar for exterior applications), metal (galvanized steel or aluminum), or even plastic. Wood is a common and cost-effective choice, while metal offers durability and resistance to moisture and insects. When choosing your material, consider the climate and the longevity you desire. Spacing is key—aim for consistent spacing between 16 and 24 inches on the center, depending on the sheathing material you’ll be using. This ensures adequate support and prevents sagging. Fastening is usually done with construction adhesive and screws, ensuring a secure and level attachment to the stucco. Use corrosion-resistant fasteners for metal furring strips and galvanized screws for wood to prevent rust and deterioration.
Sheathing Installation
Once the furring strips are securely in place, you’re ready to install the sheathing. Common sheathing materials include plywood, OSB (oriented strand board), and even cement board for added durability and moisture resistance. Plywood offers a smooth surface, while OSB is a more economical choice. A cement board provides excellent protection against moisture, making it a good option in humid climates. The sheathing should be installed over the furring strips, ensuring proper alignment and fastening with appropriate nails or screws. Remember to stagger the seams of the sheathing panels for added strength and to avoid weak points. Use construction adhesive for added strength and to help prevent moisture penetration.
Corner and Transition Management
Managing corners and transitions requires careful planning and execution. Here are a few common methods:
- L-Shaped Furring Strips: For inside and outside corners, use L-shaped furring strips created by joining two strips at a 90-degree angle. This creates a solid, continuous surface for the sheathing and siding to attach to, ensuring a clean and professional finish. The sheathing can then be butted against this framework.
- Mitered Furring Strips: For a more refined look, miter the ends of the furring strips at a 45-degree angle and join them to create a neat corner. This method requires more precision but yields a more aesthetically pleasing result. Again, the sheathing is butted against this structure.
- Corner Boards: For added strength and a clean transition, you can use pre-made corner boards specifically designed for board and batten siding. These provide a finished edge and a robust framework to support the siding. The sheathing would be attached to the furring strips up to the corner board, and then the corner board would be installed.
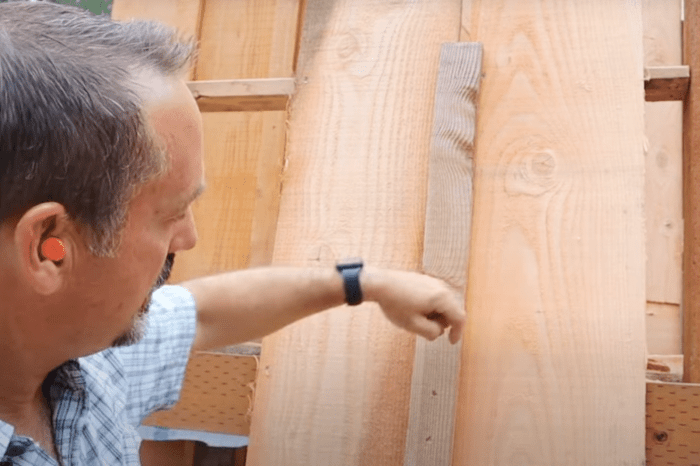
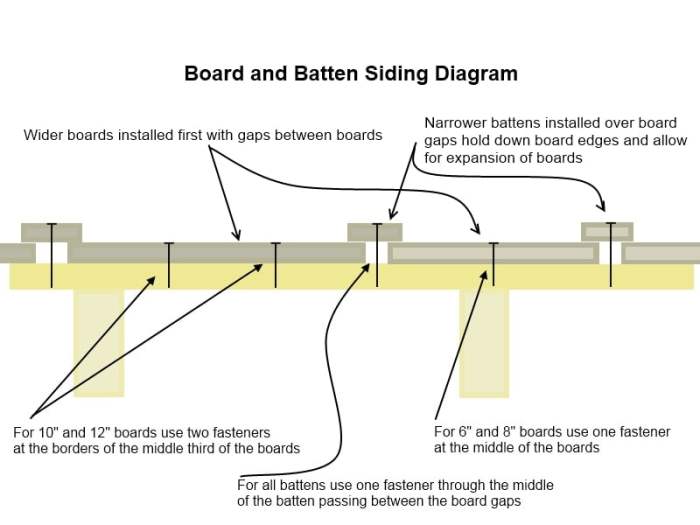
Board and Batten Installation

Source: hzcdn.com
Installing board and batten siding over stucco offers a beautiful, durable, and classic exterior upgrade. This section details the process, from cutting and fitting the boards to installing trim and creating various design options. Remember to always prioritize safety and use appropriate personal protective equipment (PPE).
Board and Batten Installation Steps
Begin by carefully measuring and cutting your boards to the appropriate lengths. Use a sharp utility knife or circular saw for clean cuts, ensuring you account for overlaps and mitered corners. Pre-drilling pilot holes is crucial to prevent splitting, especially with harder wood. For fastening, use exterior-grade galvanized nails or screws, spaced approximately every 6-8 inches along the length of the board, and driven slightly below the surface to allow for caulking. For a professional look, maintain consistent spacing between boards and ensure they are plumb and level. When fitting boards, ensure snug alignment with the previously installed pieces and carefully work around any obstacles like windows or doors.
Creating a Professional Finish: Corners and Overlaps
Mitering corners creates a clean, finished look. This involves cutting the ends of your boards at a 45-degree angle to create a seamless join. Accurate measurement and precise cuts are essential here. Practice on scrap pieces first to get a feel for it. Overlaps should be consistent and neatly aligned, usually around ½ inch to ¾ inch, to create a clean, weather-resistant seam. Caulk these seams thoroughly for a watertight seal.
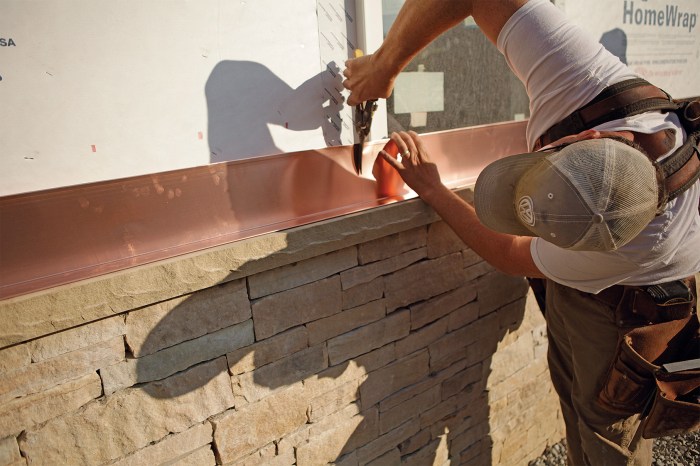
Installing Trim Pieces
Proper trim installation enhances the overall aesthetic appeal and protects the siding from the elements.
- J-Channel: Install J-channel along the edges of the house, such as around windows and doors, to create a clean, finished edge for the siding. Nail it securely to the sheathing, ensuring it is plumb and level.
- Corner Trim: Use corner trim to neatly finish exterior corners. These pieces are designed to fit snugly and provide a strong, weatherproof corner. Ensure they are properly aligned and fastened.
- Window and Door Casings: Install window and door casings after the siding is complete. These pieces frame the openings and add a decorative touch. Measure carefully and miter the corners for a professional look. Securely fasten the casings with appropriate nails or screws.
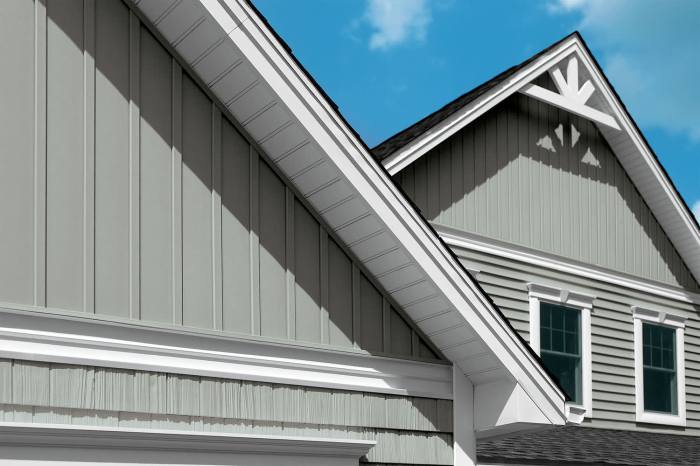
Board and Batten Design Options, Installing board and batten siding over stucco
Several design options exist for board and batten siding, each offering a unique aesthetic.
- Vertical Board and Batten: This classic design creates a sense of height and elegance. Imagine tall, slender boards running vertically from the foundation to the roofline, with narrower battens creating a clean, lined pattern between the boards. This design is particularly effective on taller homes, giving them an imposing presence.
- Horizontal Board and Batten: A horizontal layout provides a more traditional, cottage-like appearance. Picture wider boards running horizontally across the facade, with thinner battens spaced evenly between them. This option can make a house appear wider and more sprawling.
- Mixed Board and Batten Patterns: For a truly unique look, consider incorporating both vertical and horizontal elements. You might have vertical siding on one section of the house and horizontal on another, or use a more complex pattern combining both orientations. This offers a modern, customized look.
Caulking and Finishing: Installing Board And Batten Siding Over Stucco
Source: cabindiy.com
Getting to this stage means the bulk of your board and batten siding project is done! Now it’s time to finesse everything and give it that professional, long-lasting finish. Proper caulking and sealing are crucial for preventing water damage and ensuring your siding looks great for years to come. A final coat of paint or stain will make it pop.
Caulking Gaps and Seams
Caulking is essential to seal any gaps or cracks between the board and batten, the underlying sheathing, and any adjoining structures like windows or doors. This prevents water infiltration, which can lead to rot and damage. Use a high-quality, paintable exterior-grade caulk, specifically designed for use with wood and stucco. A good choice would be a silicone-modified acrylic caulk, known for its flexibility and durability. Apply the caulk using a caulking gun, ensuring a smooth, continuous bead. Tool the caulk with a wet finger or a caulking tool to create a neat, finished look and press it firmly into the gaps. Allow the caulk to fully cure according to the manufacturer’s instructions before proceeding to the next step.
Applying a Protective Sealant
Before painting or staining, consider applying a wood sealant or primer designed for exterior use. This extra layer of protection will help prevent moisture absorption, enhance the longevity of your paint or stain, and improve the overall durability of the siding. Apply the sealant according to the manufacturer’s instructions, ensuring even coverage. Allow it to dry completely before painting or staining.
Painting or Staining the Siding
Painting or staining your new board and batten siding is the final step in transforming your home’s exterior. For painting, start with a high-quality exterior primer designed for wood. This will provide a better surface for the paint to adhere to and will improve the overall finish. Apply at least two coats of high-quality exterior paint, allowing each coat to dry completely before applying the next. For staining, choose a high-quality exterior wood stain that offers UV protection. Apply the stain according to the manufacturer’s instructions, typically involving one or two coats. Remember to protect any areas you don’t want to be stained with painter’s tape and drop cloths.
Tools and Materials
The following table lists the necessary tools and materials for the entire board and batten siding installation process. Having everything organized beforehand will make the job much smoother and more efficient.
| Tool/Material | Description | Quantity | Purpose |
|---|---|---|---|
| Measuring Tape | Used for accurate measurements. | 1 | Essential for accurate cutting and placement of materials. |
| Level | Ensures straight lines and proper alignment. | 1 | Crucial for a professional and even look. |
| Circular Saw | Used for cutting wood materials. | 1 | For precise cuts of board and batten pieces. |
| Hammer | Used for driving nails. | 1 | Securing the siding to the framing. |
| Nail Gun (Optional) | Speeds up the nailing process. | 1 | Increases efficiency of installation. |
| Caulk Gun | Applies caulk to seal gaps and seams. | 1 | Essential for weatherproofing. |
| Exterior-Grade Caulk | Seals gaps and seams. | As needed | Prevents water damage. |
| Wood Sealant/Primer | Prepares the wood for paint or stain. | As needed | Enhances paint/stain adhesion and durability. |
| Exterior Paint or Stain | Provides a protective and aesthetically pleasing finish. | As needed | Protects the siding from the elements. |
| Paintbrushes/Rollers | Applies paint or stain evenly. | As needed | For efficient and even application. |
| Safety Glasses | Protects eyes from debris. | 1 | Important safety precautions. |
| Work Gloves | Protects hands. | 1 pair | Important safety precautions. |
| Drop Cloths | Protects surfaces from paint or stain. | As needed | Prevents mess and damage. |
| Board and Batten Siding | The main material for the siding. | As needed | The visible exterior cladding. |
| Stucco (if applicable) | Existing wall material being covered. | As needed | Underlying substrate. |
| Framing Lumber | Used for creating a solid base for the siding. | As needed | Structural support. |
| Sheathing | Material used to cover the framing. | As needed | Provides a solid surface for siding. |
| Nails | Fasten the siding to the framing. | As needed | Securing the siding to the framing. |
Addressing Specific Challenges
Source: theskunkpot.com
Installing board and batten over stucco presents unique challenges due to the stucco’s texture and potential for inconsistencies. Careful planning and execution are key to achieving a professional-looking, long-lasting result. This section details techniques for overcoming common obstacles.
Working Around Windows and Doors
Precise cuts and careful measurements are crucial when installing board and batten around windows and doors. Failing to properly account for these features can lead to gaps, misalignments, and an overall unprofessional appearance. The key is to pre-plan your cuts meticulously, using accurate measurements and a sharp utility knife or saw for clean lines. Remember to account for the expansion and contraction of the wood due to weather changes, leaving slight gaps as needed. Using a combination square and speed square is highly recommended for accurate angle cuts.
Managing Uneven Stucco Surfaces
Uneven stucco surfaces can cause problems with the installation of board and batten, resulting in gaps or uneven spacing between the battens. To address this, consider using shims or furring strips to create a level surface for the battens to sit on. This ensures a consistent gap between the battens and the wall, resulting in a professional and even finish. Remember to carefully check the levelness of your surface frequently during the process. For significant irregularities, consider using a thicker layer of shims to level the surface.
Handling Stucco Damage or Deterioration
Before installing board and batten, any significant stucco damage or deterioration must be repaired. This is crucial for the long-term durability and aesthetic appeal of the project. Repairing damaged areas involves removing loose or crumbling stucco, cleaning the area thoroughly, and applying a patching compound to fill any gaps or holes. Once the patch is dry, sand it smooth and apply a fresh coat of stucco or paint to match the existing surface. Ignoring this step could lead to future problems with moisture penetration and structural integrity.
Installing Around a Window: A Visual Description
Imagine a window framed by existing stucco. The board and batten will need to be precisely cut to fit snugly around the window frame.
Step 1: Measure and Mark. Carefully measure the distance from the window frame to the surrounding wall on all sides. Mark these measurements on the board and batten pieces.
Step 2: Cut the Battens. Use a sharp utility knife or saw to cut the battens according to your measurements. Make sure your cuts are clean and precise to avoid gaps. Consider using a miter saw for accurate angle cuts, especially on corners.
Step 3: Pre-fit and Adjust. Dry-fit the cut battens around the window frame before applying any adhesive or fasteners. Make any necessary adjustments to ensure a perfect fit.
Step 4: Secure the Battens. Once you’re satisfied with the fit, apply construction adhesive to the back of the battens and secure them to the wall using nails or screws. Ensure the nails or screws are countersunk to allow for a smooth finish.
Step 5: Caulk and Finish. After installing all the battens, carefully caulk any gaps or seams between the battens and the window frame, ensuring a watertight seal. This will prevent moisture damage and ensure a professional finish. The final step is to paint the board and batten to match your desired aesthetic. This process will result in a seamless integration of the board and batten around the window, enhancing the overall look of the project.
Final Conclusion
Source: hzcdn.com
Transforming your stucco home with board and batten siding is a rewarding project that significantly enhances your home’s aesthetic appeal and provides long-lasting protection. By following the steps Artikeld in this guide – from careful surface preparation and proper framing to precise siding installation and meticulous finishing – you can achieve a professional-looking result that will stand the test of time. Remember, attention to detail at each stage is crucial for a successful outcome. Enjoy the process and the stunning new look of your home!